Quick Start Guide
Welcome to LushLOD Trees!
This quick start guide will help you create your first scene using LushLOD Trees.
Quick Start Guide
In this guide, we will create a new scene from scratch. However, if you already have a scene that is populated with standard Unity Trees, you can convert the entire scene using the Scene Converter too. The Scene Converter tool is discussed in another topic.
Introduction
LushLOD Trees are Unity Tree Creator trees which have been converted and modified. If you want to convert your own trees, the conversion process will be discussed in a later topic.
LushLOD Trees have a high quality mesh, and a low quality "billboard" mesh. The high quality mesh is similar to the tree, prior to conversion. The low quality mesh is a simplified mesh which displays screenshots of the tree from various angles. The billboard model appears when the tree is further away from the camera.
By displaying billboards on distant trees, it is possible to render thousands of trees onto the screen with minimal cost of frame rate, even on older graphics cards and mobile devices.
Transitions
Transitions occur when the game is active, as you move the main camera away from a LushLOD Tree. A script which is attached to the tree will measure the distance between the camera and the tree, to gradually transition between the high quality mesh and the billboard mesh, to minimize abrupt changes in the appearance of the tree during the transition.
Billboard Quality
LushLOD Trees have several different quality levels that affect the billboards. At the lowest quality level, the billboards are rendered with a very simple shader. This may work good if you wish to squeeze out a little more frames per second on mobile graphics cards. The highest quality level for the billboards is "Ultra", which uses state-of-the-art post processing effects and advanced shaders to smoothen out hard edges and blend seams in the billboards, and improve the quality of the transitions.
The Manager
We will discuss the manager in more depth in another topic. But for now I'll just briefly mention what it is. The manager is a script that is attached to a game object which appears in your hierarchy. It has options which allow you to quickly and easily change the color and quality of all of the LushLOD Trees in your scene.
Creating your First Scene
For this quick start guide, we will use the same LushLOD trees that are seen in the demo scene, to create a new scene from scratch. LushLOD Trees come as "ready to use" prefab files that can be simply dragged and dropped into a scene with minimal setup required.
Begin by importing the LushLOD Trees package into your project. Because this is a beta product, it is highly recommended that you make a backup of your project prior to importing LushLOD Trees.
- You should be able to begin the import process from the Asset Store webpage where you purchased LushLOD Trees. Simply follow the instructions on that web page to complete the import process.
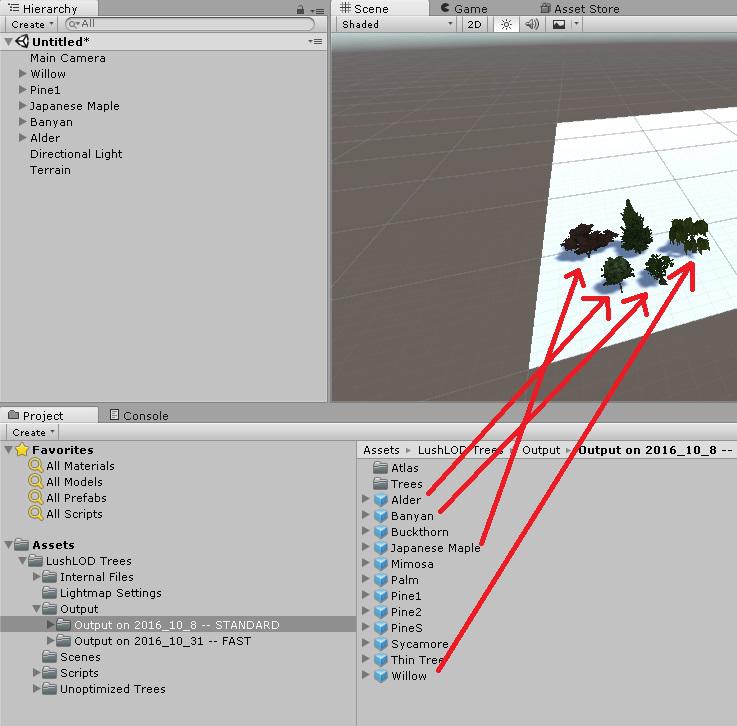
Once you finish, you should see a folder named "Output" located at Assets / LushLOD Trees / Output.
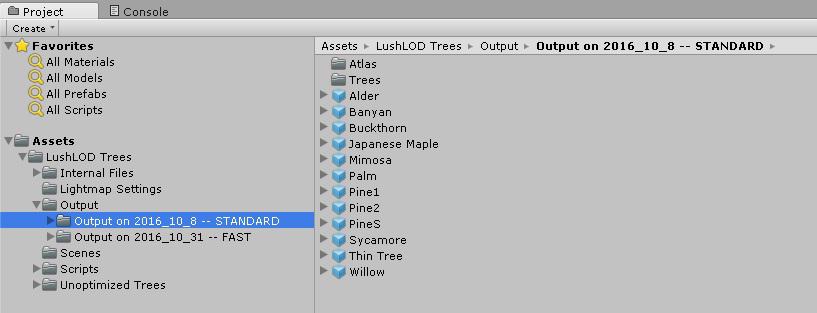
Inside the "Output" folder you should see a dated folder that ends with the word "STANDARD", and another that ends with the word "FAST".
Fast vs Standard Trees
Now would be a good time to discuss the difference between the fast and standard trees. The trees in the "FAST" folder are not necessarily very much faster than the trees in the "STANDARD" folder. They simply use the "fast" version of Unity's Tree Creator shader, which is called TreeCreatorLeavesFast.
When you create an editable tree using Unity's Tree Creator, you have the option to use one of two different shaders for the leaves. One shader is called TreeCreatorLeaves, and the other is called TreeCreatorLeavesFast. When converting these trees into LushLOD Trees, the shader you chose to use when you make your Tree Creator tree will affect the shader that is used once it is converted into a LushLOD Tree.
All of the example trees that are included with LushLOD Trees come in both the standard and the fast versions. However, in this beta release, I have not yet implemented all of the features for the fast version yet. In particular, the fast version does not yet support Ultra quality. So if you want to use the Ultra quality setting for your LushLOD Trees, you will need to avoid using the Fast shaders for now.
Interesting NOTE: Some of the trees found in these folders were originally just basic, non-editable meshes which were part of the Standard Assets -> Environment package created by Unity Technologies. Their original, non-editable version has since been depreciated and is no longer included in the latest versions of Unity. Since then, they have been painstakingly upgraded (by me) into fully editable Unity Tree Creator trees. Those fully editable trees are included in the "LushLOD Trees/Unoptimized Trees" folder. They were then converted into LushLOD Trees. What you are seeing in this Output folder is the latest, ready-to-use LushLOD Tree version of those trees. Hope you like them!
For this quick start guide, we will use the trees that are in the "STANDARD" output folder.
Let's create the scene, and add a basic terrain object.
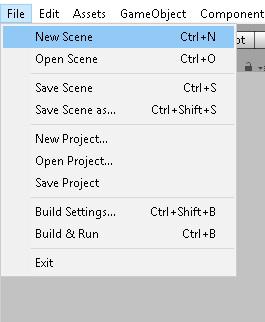
Select File -> New Scene to create a brand new scene.
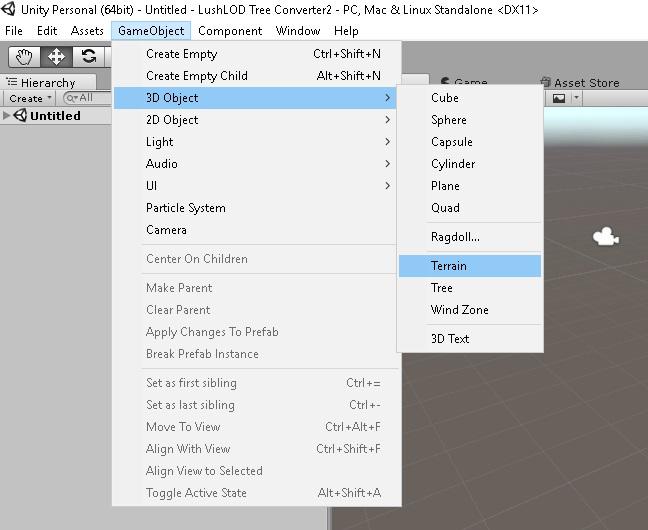
Once you've created a new scene, let's create a basic terrain so that we have some surface area to work with. Select GameObject -> 3D Object -> Terrain to create a flat, basic terrain.
Now you should have a large white-colored, square shaped terrain in the scene. You may need to move the scene camera around to get a better look at it. See image below.
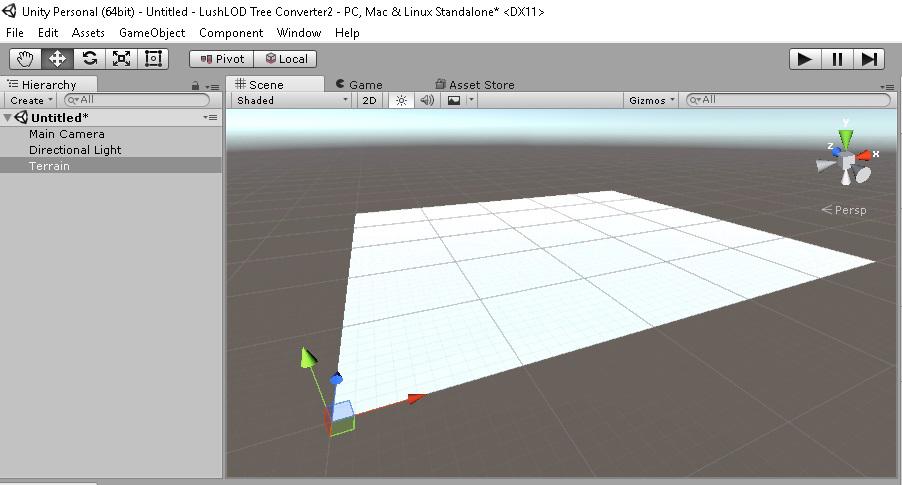
Now we are ready to add some trees to the terrain.
Terrain NOTE: If you are familiar with terrains you may be aware that terrains have a built-in component which can add certain types of trees directly to the terrain data. Please note that LushLOD Trees do not support this method of adding trees to the terrain.
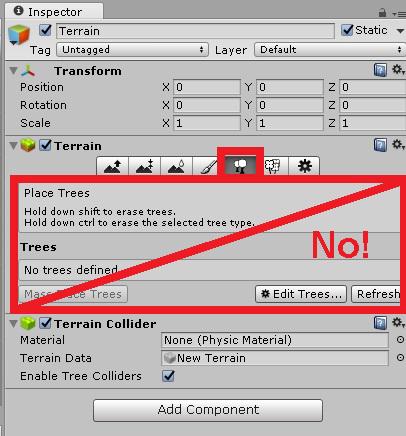
As seen in the above screenshot, there is a "Terrain" component attached to the terrain, which has a number of buttons that allow you to add and edit trees on the terrain. This feature is NOT supported by LushLOD Trees.
However, if you have a scene that already has a terrain with trees added to it, and you want to convert your scene to LushLOD Trees, there is a Scene Converter tool to do this for you. The Scene Converter will be discussed in another topic.
LushLOD Trees support a variety of powerful third-party tools to add trees to your terrain, including Gaia and Terrain Composer 2, both of which can be purchased on the Asset Store from other vendors. I will be creating separate tutorials to demonstrate how to create beautiful terrains using these tools along with LushLOD Trees. Expect to see those tutorials soon, in a later topic.
For this quick start guide, we will not be using any fancy tools or automated system to add trees to the terrain. Neither are we going to attempt to create a beautiful, photo-realistic terrain. For now, we will simply drag and drop some trees onto this basic terrain to demonstrate how easy it is to make the trees work.
Adding Trees to the Scene
Select the Alder tree prefab, and drag and drop it onto the terrain.

You can drag and drop as many of the trees as you like, before continuing to the next step. :)
Now we've finished adding trees to the scene, let's set up the manager.
Manager Setup
Select one of the trees in the hierarchy view. Do not click on the trees in the Scene window to make your selection, because if you do that, you may select only part of the tree (such as the billboard only). To select the whole tree, always use the Hierarchy window to make your selection.
After you've selected a tree, the Inspector window will have a button with the text "Create _LushLODTreesManager". Click that button to create the manager.
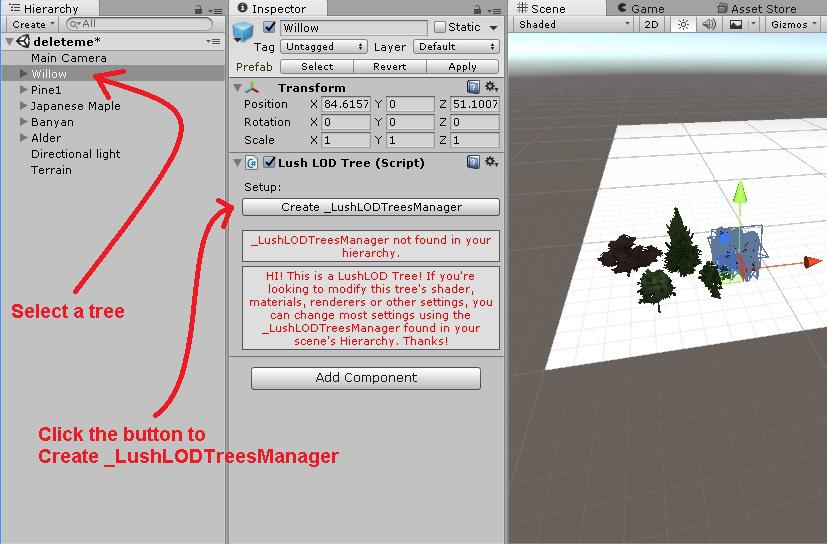
The manager will automatically be selected when it is created this way.
With the manager now selected, click the button in the Inspector window to "Setup Trees Root".
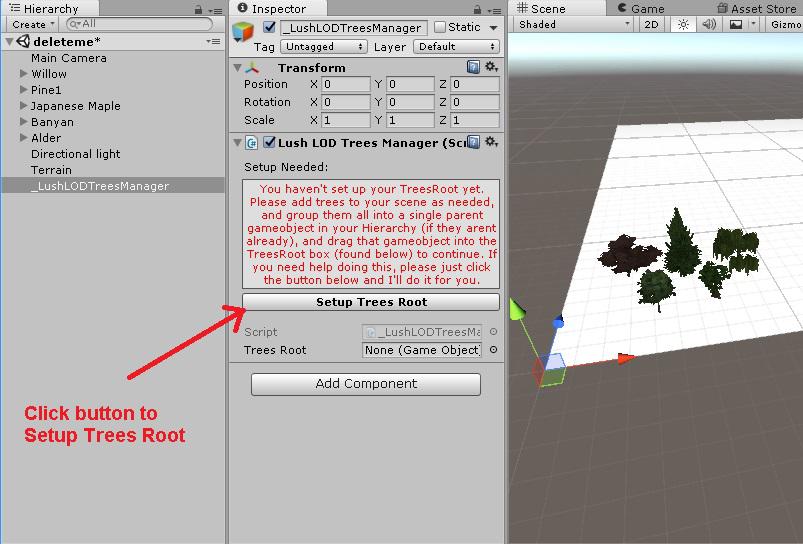
A new GameObject named TreesRoot will be created, and all the trees will be moved into it in the Hierarchy automatically.
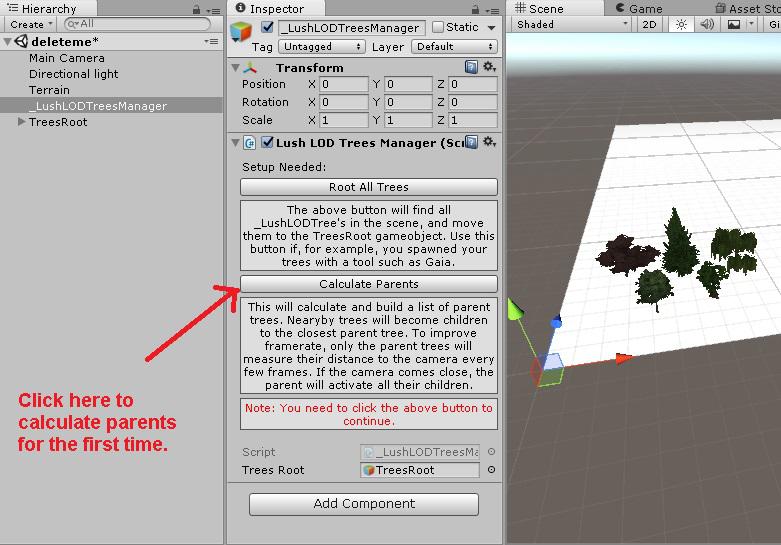
Now some new buttons will appear. Click the button named "Calculate Parents".
Main Directional Light
LushLOD Trees use a custom lighting setup that supports baked shadows. To make it work correctly, the manager needs to know which light is your main directional light.
Drag and drop the "Directional light" from your Hierarchy window into this slot in the Inspector window.
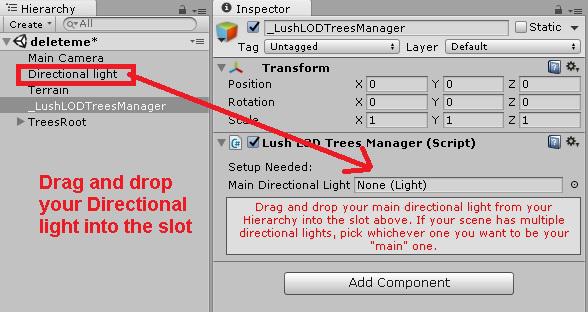
NOTE: LushLOD Trees only support a single directional light in the scene. If you have multiple directional lights (which isn't recommended), you should pick whichever one you want to be your main one.
Once you finish, the initial setup of the manager is finished. You should only have to do this once for a scene. Here's what the manager should look like now (more or less):
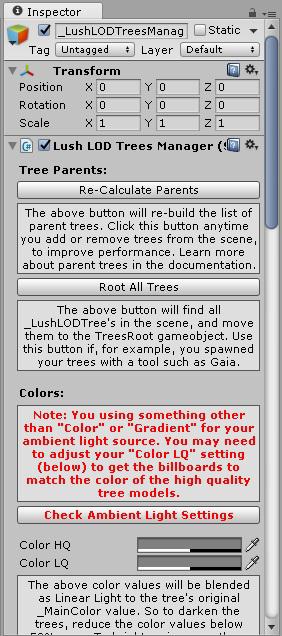
Ambient Light Setup
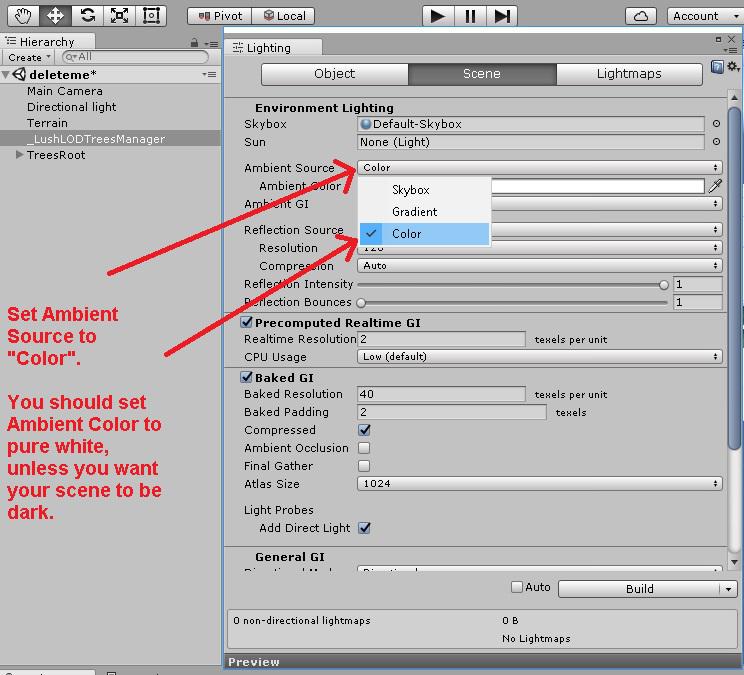
If your scene is set to use Skybox ambient lighting, you may see some red text in the "Colors" section of the manager, as seen in the above image. Let's fix that issue now.
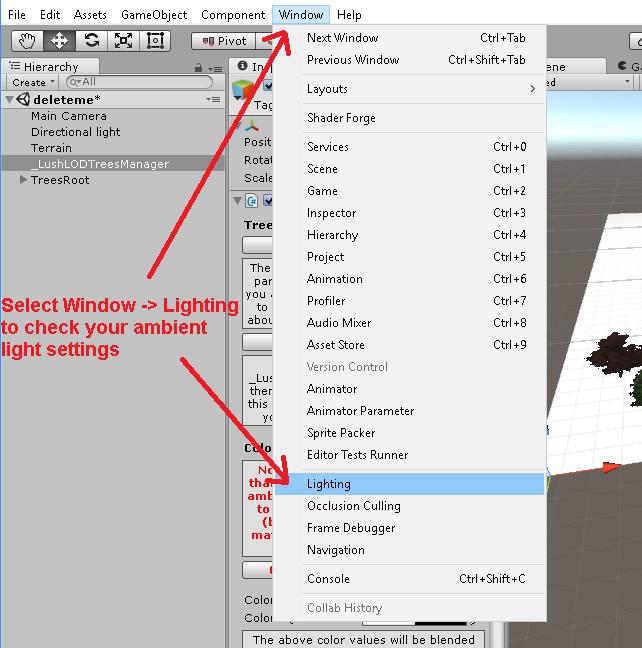
LushLOD Trees currently only support flat or gradient ambient lighting. If your scene is set to use Skybox ambient lighting, the trees will probably not look right. You can check your ambient light settings by clicking on the Window -> Lighting menu option, and then select Flat or Gradient as your ambient light source.
For now, set Ambient Source to "Color", and set Ambient Color to pure white, unless you want your scene to be dark. Note that the billboards display screenshots of the trees with plenty of light, at the time the screenshots were taken. If you need the billboards to look good in darkness, you may want to re-generate them with less lighting. I'll talk more about how to re-generate the trees (or converting new trees) in a later article.
And you're done with the lighting and setup of the manager!
Ultra Quality
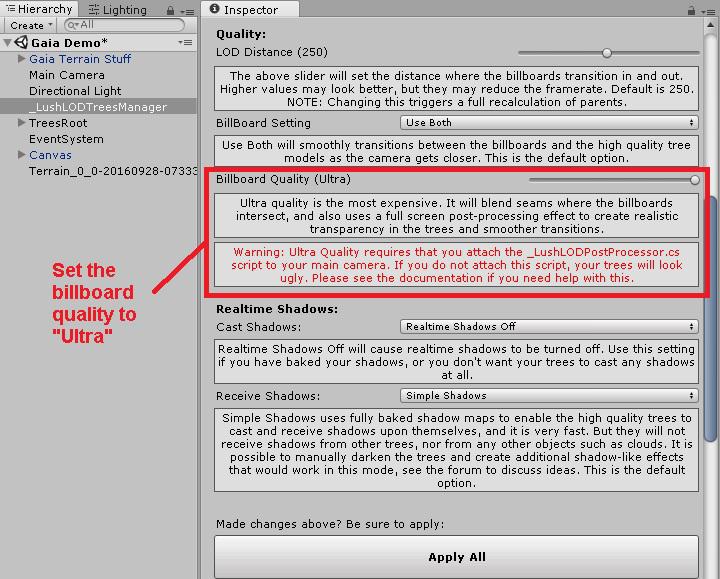
Ultra quality is a billboard quality setting found in the manager. It uses a post-processing effect to smoothen out the transitions between billboards and high quality tree models. To get Ultra quality working, we will need to attach a post-processing script to the main camera. Let's take a look at the correct way to set it all up!
First, with the _LushLODTreesManager game object selected, scroll down in the Inspector window and find the setting named "Billboard Quality". Use the slider on the right to change it to "Ultra".
Post Processing Effect
Ultra billboard quality requires a special post-processing script to be attached to the main camera. Let's set that up now.
Note: This step is only required if you plan to use Ultra quality setting.
Select the main camera in the Hierarchy. Then in the Inspector window, click the "Add Component" button. Then select Scripts -> Lush LOD Post Processor.
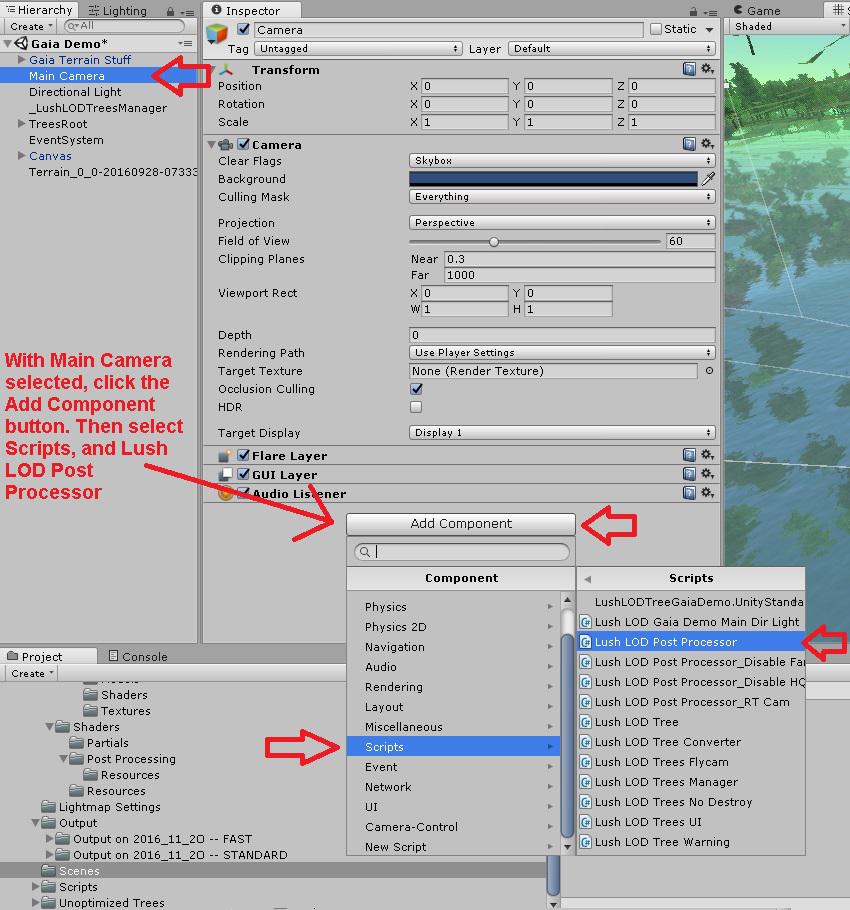
Once to complete the above step, the post processor should now be attached to the Main Camera, and the warning in the manager should now be gone. That's it!
Go ahead and save your scene. In the next part, we will take a look at Water reflections in the Gaia Demo scene.
Reflection Cameras on Ultra Quality Billboard Setting
Note: This step is only required if you plan to use Ultra quality setting.
For this part of the guide, we'll need to open the "Gaia Demo" scene. You'll find it in your project folder at "Assets -> LushLOD Trees -> Scenes -> Gaia Demo.scene". Go ahead and open that scene now.
In the Gaia demo scene, there are some water reflection cameras that make the pretty water reflections possible. Those cameras render a lower resolution image of the scene, which is drawn directly onto the water, to create the reflection.
If your scene has any reflection cameras, or other secondary cameras that will be rendering the trees, you will need to decide how you wish for those cameras to perform the necessary post-processing effect (if you plan to use Ultra quality setting). Otherwise, the trees will look terrible when they appear in your secondary cameras.
Rather than attaching the full post-processing effect to these secondary cameras, you may wish to simply turn off the "Ultra" quality effects on these cameras. This is effective for water reflection cameras in particular, because they render such a low quality image (and a distorted image) of the scene, that you can't clearly see the trees anyway, so there is no benefit in using Ultra quality on the water reflections.
So here's how the water works in the Gaia Demo scene:
- The transitions are fully disabled (no post processing effect)
- The high quality tree models are fully disabled
- Only the billboards are seen in the water reflections
To disable these various effects in the water reflections, we must attach a script to the water reflection camera. But let's find this camera first.
In the Gaia Demo scene, find the game object named "Gaia Terrain Stuff". It's in the Hierarchy window. And inside of it, you'll find a camera named "WaterReflectionMain Camera". Select that camera.
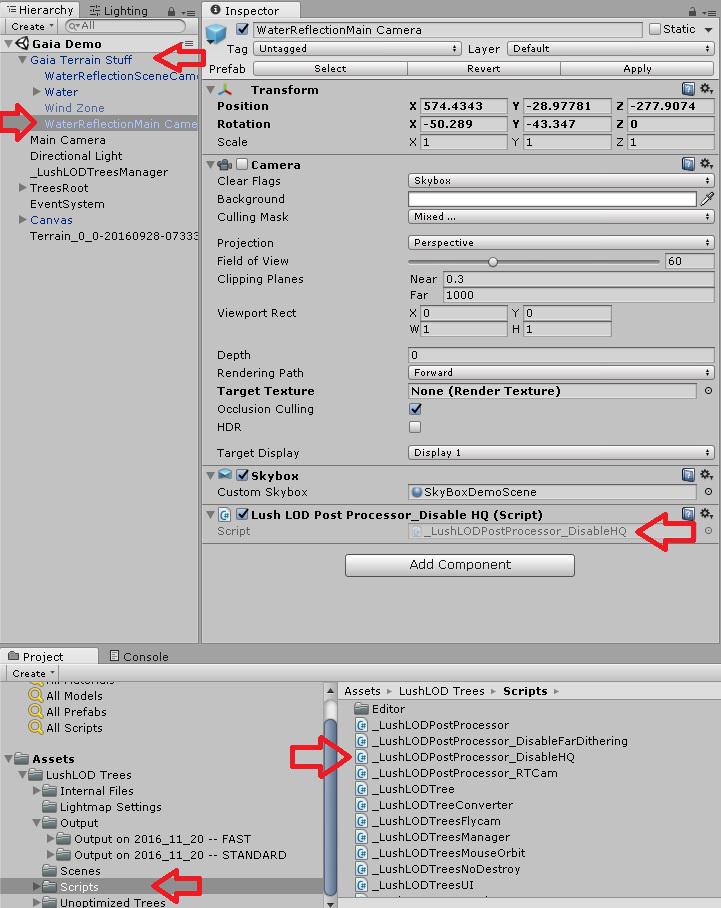
Once you have the camera selected, you will see that there is a script attached to the camera named "_LushLODPostProcessor_DisableHQ". This script disables the high quality tree models, ensuring that only the billboards are seen in the water reflections. And without high quality tree models, there also is no need to transition between the billboards and the high quality tree models, so this script also disables the transitions as well. And with no transitions, we also don't need the post processing effect... so this script doesn't perform the post processing effect.
But this isn't the only script that I've included to help you handle your secondary cameras. There are a number of scripts that you can attach to your camera(s) in your scene, to help with rendering the trees on Ultra quality setting. They are all found in the LushLOD Trees -> Scripts folder. Let's look at what each script does.
- _LushLODTreesPostProcessor_DisableHQ: This script will disable just about everything to do with the Ultra quality setting. It will disable the high quality tree models, and render only the billboards. This means that there will be no transitions on the camera that this script is attached to. It will also not perform any post processing effect.
- _LushLODPostProcessor_RTCam: This script will not disable anything, but rather it will actually perform the post processing effect on the camera that it is attached to. This script will attempt to do the same thing as the _LushLODPostProcessor script, except that this script is intended to be used on cameras that are rendering to a RenderTexture. Note that RenderTextures are outside the scope of this Quick Start Guide. To learn more about RenderTextures, see Unity's official documentation on the subject.
- _LushLODPostProcessor: This script performs the post processing effect. This script works on cameras that are NOT rendering to a RenderTexture, such as cameras that are rendering directly to some portion of the screen.
For the Gaia Demo scene, I used the _LushLODTreesPostProcessor_DisableHQ script for the water reflection cameras, and the _LushLODPostProcessor script for the Main Camera. For each of the cameras in your scene that will be rendering the trees in any way, you'll need to pick one of these scripts to attach to those cameras, if you plan to use Ultra quality setting. Note that none of these scripts are required if you plan to use a lower quality setting, such as "Great". The lower quality settings do not require any of these scripts to be attached to any of your cameras.
Quick Start Complete!
Congratulations! Your trees are ready to be viewed.
Save then scene, hit play, and enjoy!
Customer support service by UserEcho
