Tree Converter Tutorial
Introduction
The LushLOD Tree Converter is a script that can convert any tree created in the Unity Tree Creator into a LushLOD Tree. The process will create a billboard version of the tree, along with an atlas image, which enables the tree to work with LushLOD's powerful LOD systems and Unity's draw call batching.
Since you can use any tree created with Unity's Tree Creator, you have endless possible trees you can produce. There are also many vendors on the Unity Asset Store that are selling Unity Tree Creator trees, so you have plenty of tree variations available.
NOTE: The LushLOD tree converter does not currently work with SpeedTree® trees.
Included Trees
The LushLOD Trees package comes with a few example trees to get you started. If you purchased LushLOD Trees, you are welcome to use these example trees in your game as-is, or you can modify them and re-convert them.
You can also use your own Unity Tree Creator trees, or Unity Tree Creator trees that you purchase from the Asset Store.
License Restrictions
Question: Can I resell or redistribute converted LushLOD Trees?
Answer: No. LushLOD Trees use special shaders and scripts which contain licensed source code that cannot be resold or redistributed. Because the trees will not work properly without these shaders and scripts, it is not possible to distribute or resell converted LushLOD Trees without also illegally distributing the source code that makes them function properly. Your license grants you the right to use LushLOD Trees in any game you make, but you cannot include them in any form that would give unlicensed users access to use the trees outside of your game.
Before you begin
This tutorial assumes that you have some nice Unity Tree Creator trees that did not come with LushLOD Trees. They may be trees that you made yourself, or trees that you purchased on the Unity Asset Store. Please note that all of the trees which are included with LushLOD Trees have already been converted, and you do not need to convert them again unless you wish to make modifications to them. :)
Please note that because an atlas image is created, it is highly recommended that you convert all of your trees at the same time, so that they will all appear in a single atlas image. This will reduce the draw calls to just 1 for the billboards. A single atlas image of 4k size should be able to support around 340 different types of trees, which should be enough for the vast majority of scenes. This means that if you need to make a change to just one of your trees, you'll want to re-convert ALL of the trees in your scene, so that they will be together in the same atlas image.
Also note that after you convert a tree, you are free to change the angle, rotation and scale of the tree, and you do not have to convert the tree again just to do that. You can also instantiate multiple copies of the same tree into your scene, and each copy can have a different rotation, angle, and scale. However, before you convert your trees, please be sure that your tree's Transform values set to their defaults. Scaling the tree prior to conversion will mess up some of the fancy shader effects, so please don't scale your trees prior to conversion.
Texture Atlases
The LushLOD Tree converter creates a texture atlas which contains a lot of small pictures of your trees. These texture atlases allow Unity to reduce the drawcalls to just 1 for all the trees that are far away from the camera (the billboard trees).
How many texture atlases you create for your game will depend on the number of scenes you plan to have, and whether or not each of those scenes uses the same trees, or completely different trees. For example, if you have two scenes in your game, one with angelic looking trees, and the other with haunted looking trees, then you should separate those trees into two atlases so that each scene will load only the trees that it will be using.
To separate the trees into two different atlases is easy. You simply run the converter twice, once for your angelic trees, and once for your haunted trees. Each time you run the converter, it will generate an atlas image. So if you run the converter twice, then you'll have two atlas images, and this is how you can separate your trees into multiple atlases.
Question: Can you use multiple LushLOD Tree atlases in a single scene?
Answer: Yes. But it isn't recommended, as it may result in multiple draw calls. It's best to try to get all the trees for each of your scenes into a single atlas.
Question: What if all your scenes use the same trees, can you use the same atlas in multiple scenes?
Answer: Yes, you can simply use a single atlas for your entire game, and all your scenes can use the same atlas, there is no requirement to generate a different atlas for each of your scenes.
Question: What if my game opens multiple scenes at the same time? Will I incur multiple draw calls if I use multiple atlases in this case?
Answer: Yes, you probably would. In this case, it's best to simply convert all your trees into a single atlas, and use that same atlas in all your scenes, to keep the draw calls down to minimal.
Unity Tree Creator Optimizations
The Unity Tree Creator is a powerful tool for creating fully editable trees directly inside the Unity Editor. This guide will not discuss the steps to create trees using the Tree Creator, however, there are plenty of guides online that can help you learn how to create your own custom trees from scratch.
However, there are some best practices when creating your own trees which will help to make your trees work faster when you convert them into LushLOD Trees.
The first optimization, and perhaps the most important, is that you should limit your vertex count. All of the LushLOD Trees included in the demo scenes use about 2k to 4k vertices. It can be difficult to reduce the vertex count on trees, while still maintaining their full and "fluffy" look.
If you are using custom meshes for branches in your Tree Creator trees, one way to help reduce the vertex count is by using single-sided meshes. A single-sided mesh has half as many vertices as a double-sided mesh, and the LushLOD Tree shaders will draw both of them the same, because backside culling is turned off on all LushLOD Trees. What does this mean? It means you should aim to use just 3 vertices for each of your triangles, instead of 6. This will reduce your vertex count, and that should improve the speed of your game.
Additional significant vertex count reductions can be obtained by hiding small branches in your trees, and by reducing the "LOD Quality" of your tree, or reducing the "LOD Multiplier" value of individual branches.
Tree Convert Scene
To make it super easy to convert your trees, I've included a Tree Converter Scene. After you finish importing LushLOD Trees into your project, you can find this scene located in your Assets folder at Assets -> LushLOD Trees -> Scenes -> TreeConverter.scene
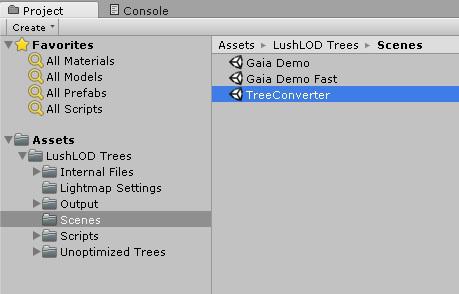
If you plan to make any changes to the scene (which you'll need to do if you intend to add your own trees to the mix), then you should make a copy of the scene first. Go ahead and make a copy of the scene for each unique atlas you plan to make.
For example, if you have two scenes, one with angelic trees and one with haunted trees, and you want to separate the trees into two atlases, then you should make two copies the TreeConverter.scene.
Making copies of the scenes now will ensure that you can return to these scenes at a later time, and make adjustments as needed.
For this tutorial, I'm making two copies of the tree converter scene. I renamed one copy to TreeConverter_AngelicTrees.scene. And I renamed the other copy to TreeConverter_HauntedTrees.scene. But you can make as many copies as you need, and name them whatever you want.
After making the copies of the scenes, my Scenes folder now looks like this:
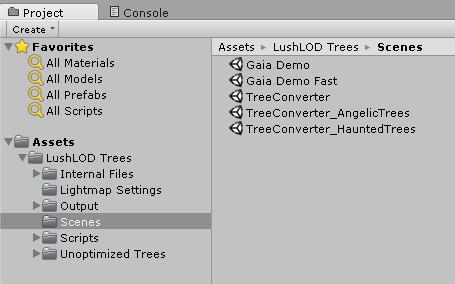
Now I can safely modify the two copies of the scene, and keep everything nice and separated.
Tree Converter Scene Overview
Open the copy of the scene that you made. For this example, we'll open the TreeConverter_AngelicTrees.scene.
The tree converter scene should look like this:
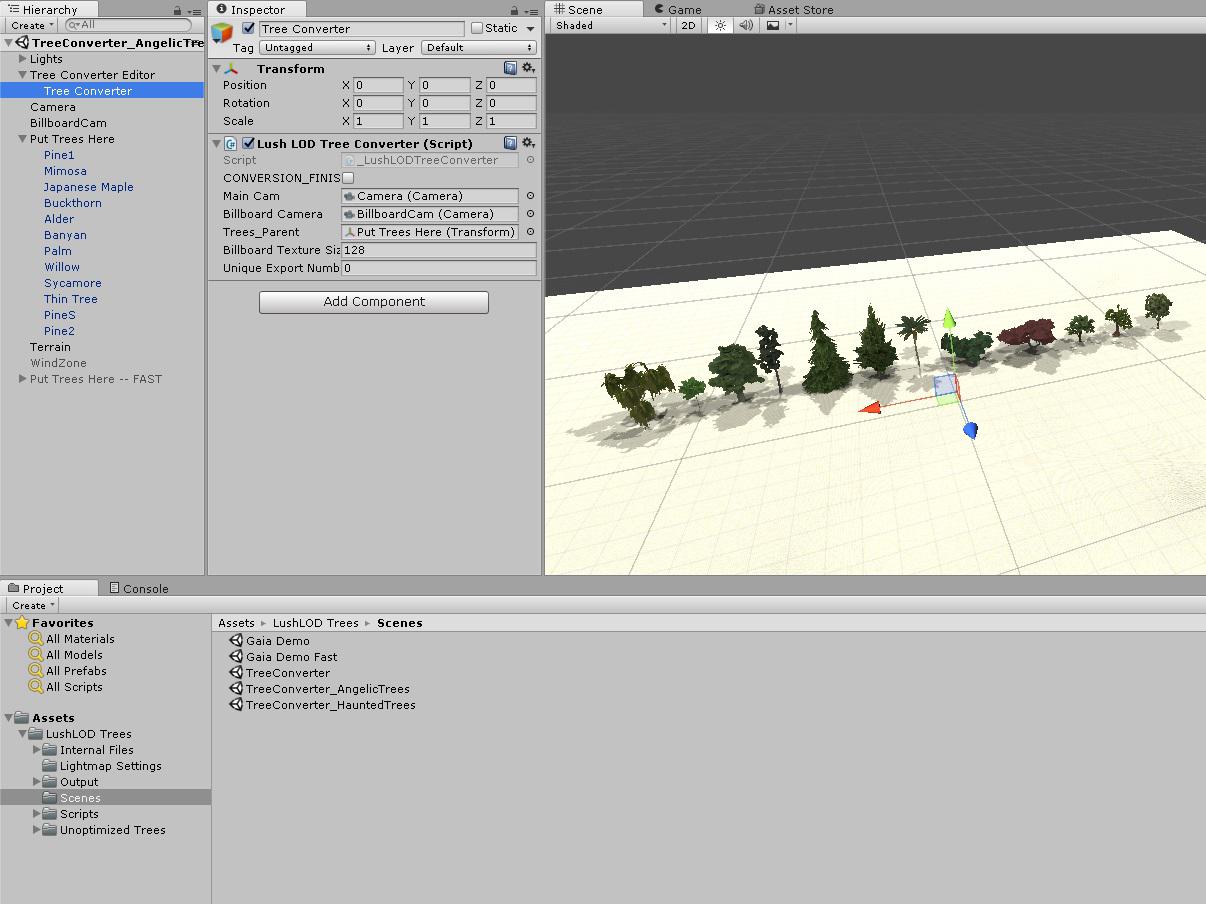
Let's take a quick look at what we have in this scene:
1) There is a row of Unity Tree Creator trees. These trees are fully editable. They are saved in the Assets -> LushLOD Trees -> Unoptimized Trees folder.
2) There is a game object in the Hierarchy named "Put Trees Here". This game object is where all the trees in your scene should be placed. Any tree that is not put here will NOT be converted by the script.
3) The main script that performs the conversion is attached to a game object in the Hierarchy, which is named "Tree Converter". It is highlighted in blue in the above screenshot.
4) There is also a game object in the Hierarchy named "Put Trees Here -- FAST". This game object appears to have almost identical trees, but they are using Unity's "Fast" Tree Creator Leaves shader. For now, we won't use these trees, so they are disabled in the scene. However, they are there in case you want them.
Unity Tree Creator Leaves "Fast" Shaders
Unity Tree Creator currently has two different leaf shaders that you can use for your trees. One is called "TreeCreatorLeavesFast" and the other is called "TreeCreatorLeaves". After your tree is generated by the Unity Tree Creator, it will append the word "Optimized" to the end of the shader name.
LushLOD Trees is currently in beta, and support for the "Fast" shader is not yet fully complete. It should work, however, it may not look quite as good, and it does not currently support the "Ultra" quality setting. Expect this to be fixed soon.
For now, if you are creating your own trees using the Unity Tree Creator, you should probably use the regular "TreeCreatorLeaves" shader, and avoid the fast shader if you can.
Running the Scene
It is safe to run the converter scene at any time. It will not overwrite any previous atlas that was generated, because it creates a new Output folder each time you run this scene.
If you wish, you can go ahead and run the scene to see what it does. It will photograph each tree from three different angles, and create the billboard meshes, and create an atlas texture image. It will then create a new "Output" folder located at Assets -> LushLOD Trees -> Output, which will contain a new prefab file for each tree, ready to be used in your game.
Editing the Scene
Let's edit the scene! The edits you may wish to make to these scene will be different depending on exactly what your needs are. For example, if you do not want any of the included trees to be in your scene, you can simply delete all of them from the converter scene, so that the game object named "Put Trees Here" has nothing in it anymore. Then, you can add your own Tree Creator trees to the converter scene.
NOTE: Please be advised that any edits you make to the "Tree" components are NOT saved in the scene file, but are saved directly into the prefab file for each tree. This may not be what you would expect. So you should probably save a backup of each tree's prefab file before you modify them, so that you can keep a copy of the original. The Unity Tree Creator tree prefabs are located in Assets -> LushLOD Trees -> Unoptimized Trees. If you plan to make changes to these editable trees, you should probably make a full copy of that folder first.
For this tutorial, I'm going to assume that you want to convert your own custom set of Unity Tree Creator trees. One set will be called "Angelic Trees", and the other set will be called "Haunted Trees". So let's convert the angelic trees.
First, open the scene that you created, which is named TreeCreator_AngelicTrees.scene.
Since we won't be using the included trees, let's delete them out of the scene.
In the Hierarchy, find the game object named "Put Trees Here". Select all of the trees inside of it, and delete them all from the hierarchy. This will remove them from the scene.

Now, add your own Tree Creator Trees to the scene. If you already have some trees that you purchased on the Asset Store, you can simply drag and drop them into the scene.
Once you've added your custom Unity Tree Creator trees to the scene, make sure that they are all located in the "Put Trees Here" game object. This ensures that they will be part of the conversion.
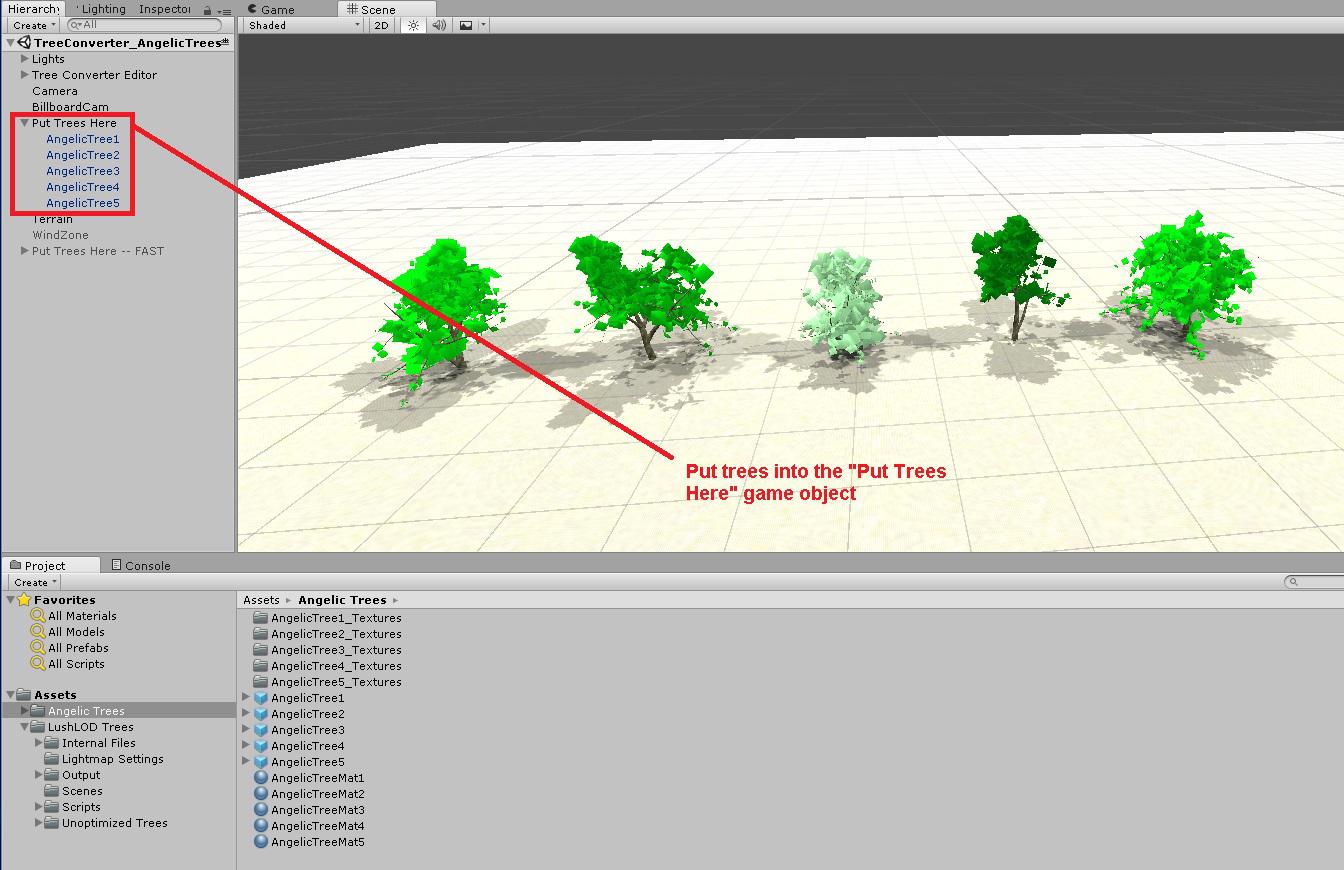
Note: These "Angelic Trees" are just low-quality dummy trees I made for the purposes of this tutorial, and they are not included with your purchase. As stated at the beginning of this tutorial, this tutorial assumes that you already have some trees which you wish to convert. So please use your own trees for this step of the tutorial.
And you're done! Simply click the "Play" button to play the scene, and the trees will be converted and added into a single atlas, and an Output folder will be created with the new prefabs, ready to be used in your game!
Be sure to save the Converter scene, so that you can always come back later and make more changes, if you ever need to.
Upgrading your Scenes
If you've already created a scene, and added thousands of trees, and then you want to edit one of the trees -- your atlas image would no longer look right! Oh no! But don't worry, it's actually quite easy to do this with LushLOD Trees.
Let's see how easy it is to upgrade a forest of trees to use a new Output folder generated by the converter scene.
Let's make a copy of the demo scene located at Assets -> LushLOD Trees -> Scenes -> Gaia Demo.scene. We'll name it Gaia Demo Angelic.scene.
Note: You don't have to use the Gaia Demo scene here. If you have your own scene that you'd rather perform the upgrade on, you can use that instead. But for this tutorial, I'll demonstrate how to do the upgrade using the Gaia Demo scene.
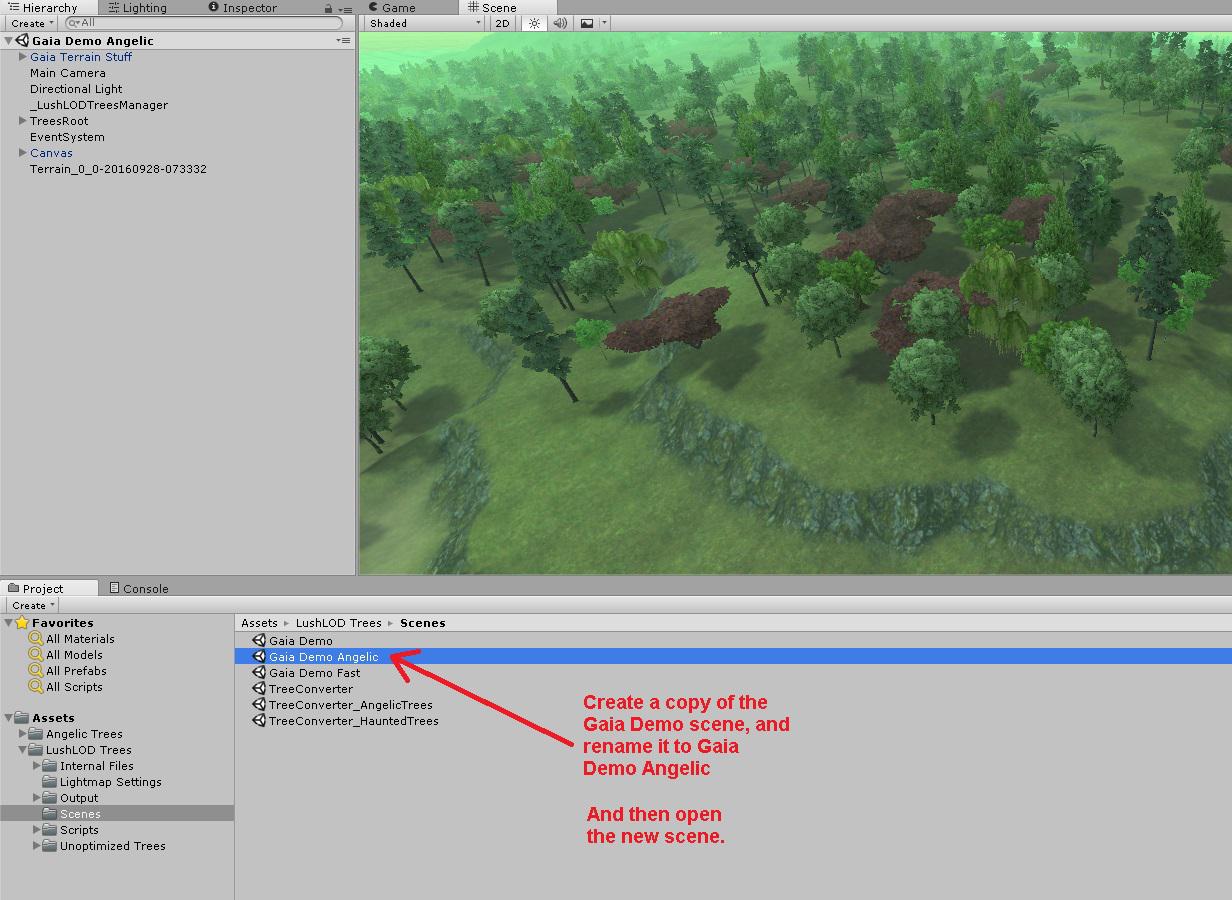
Open the Gaia Demo Angelic.scene
You may have to move the scene camera around to get a good look, but you should see a large island in the scene with thousands of trees. Let's upgrade those trees to use a different Output of trees made by the converter.
NOTE: When upgrading a LushLOD Tree's prefab, you can upgrade it to a tree that looks very similar, or even identical to the way it looked before. Or, you can upgrade it to an entirely different tree. For example, you can change an oak tree into a banana tree. Or, you can upgrade it to be a car, truck, or SUV. Well, maybe not that drastic... the new prefab needs to be a LushLOD Tree or else the upgrade will fail. :)
In the Hierarchy window, find the game object named "Trees Root". This object was explained in the Quick Start guide. If you don't see this object in your scene, you should probably check out the quick start guide to make sure your scene is fully set up properly.
Expand the TreesRoot game object, to see a list of all the trees. Select one that you wish to upgrade.
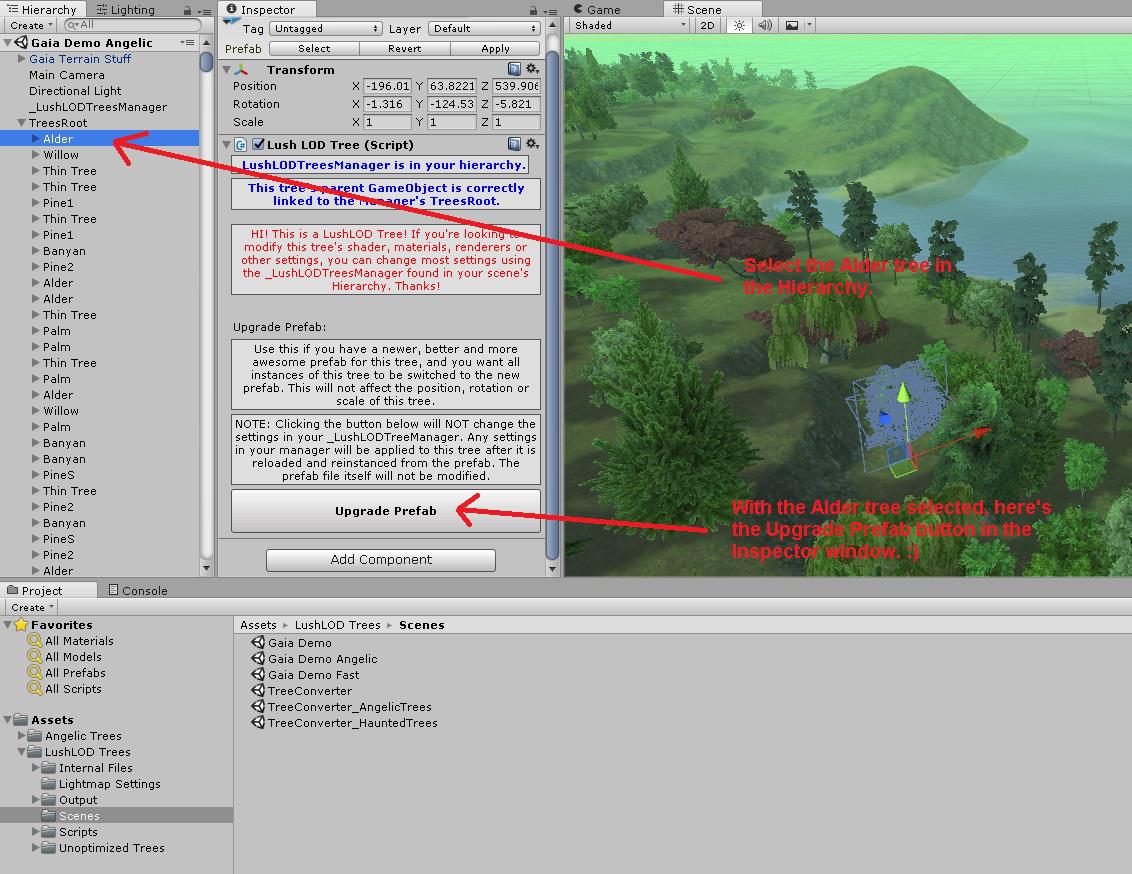
For this example, I've selected the Alder tree, which is the first tree in the list of trees found in the Gaia Demo scene.
With the tree selected, you should see a button named "Upgrade Prefab" near the bottom of the Inspector window. Click this button to begin the upgrade process. You will be asked to select a new prefab file. There is no undo for this process, so be sure to make a backup of your scene file before you do this... otherwise you will NOT be able to go back to the way it was before!
Once you upgrade just one of the Alder trees in your scene, ALL of the Alder trees in your scene will receive the upgrade. So it is only necessary to do this once for each unique type of tree in your scene. The upgrade process does not affect the position, angle, rotation or scale of any of the trees.

As seen in the above screenshot, after upgrading the Alder tree, we see that all the Alder trees in the scene have been changed to "AngelicTree1", which is one of the trees that I just converted in the previous step using the Tree Converter scene.
Question: Should I upgrade just the tree(s) that I wanted to change, and leave my "unchanged" trees the same?
Answer: Probably not. Because your "unchanged" trees will still be using your previous atlas texture. Leaving them that way will mean that your trees will now generate an additional draw call. Remember that if you upgrade the prefab for just one tree in a scene, you will probably want to upgrade them ALL to the new prefabs, to ensure that they all use the new atlas, and so that they will generate only one draw call.
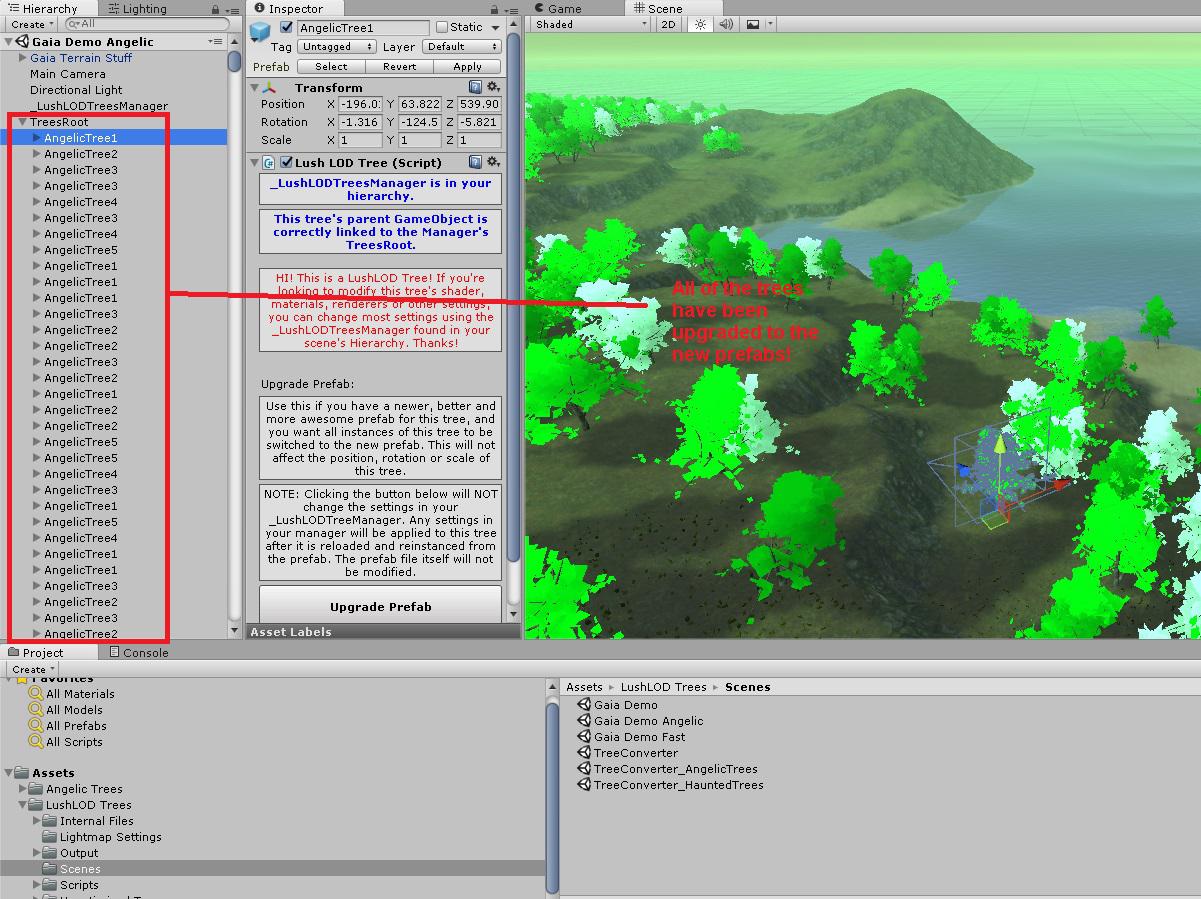
As seen in the above image, I have now upgraded all the trees in my scene to use only the "Angelic" trees I converted in the previous step. Eww, they look kind of cartoony!
Question: The above image looks like you turned all the trees into cartoon trees. What if I only want to change one of my trees, and I don't want some of my trees to be changed? How can I maintain just one draw call without upgrading / changing all the trees in my scene?
Answer: To keep just one draw call, all the trees in your scene will need to be upgraded. However, this doesn't mean they all need to change in appearance. The upgrade process doesn't have to change the appearance of every tree. For each tree that you don't want to change, simply convert the exact same Unity Tree Creator tree that you previously used, and it will be converted and included in the new atlas, but it won't look any different. See the screenshot below.
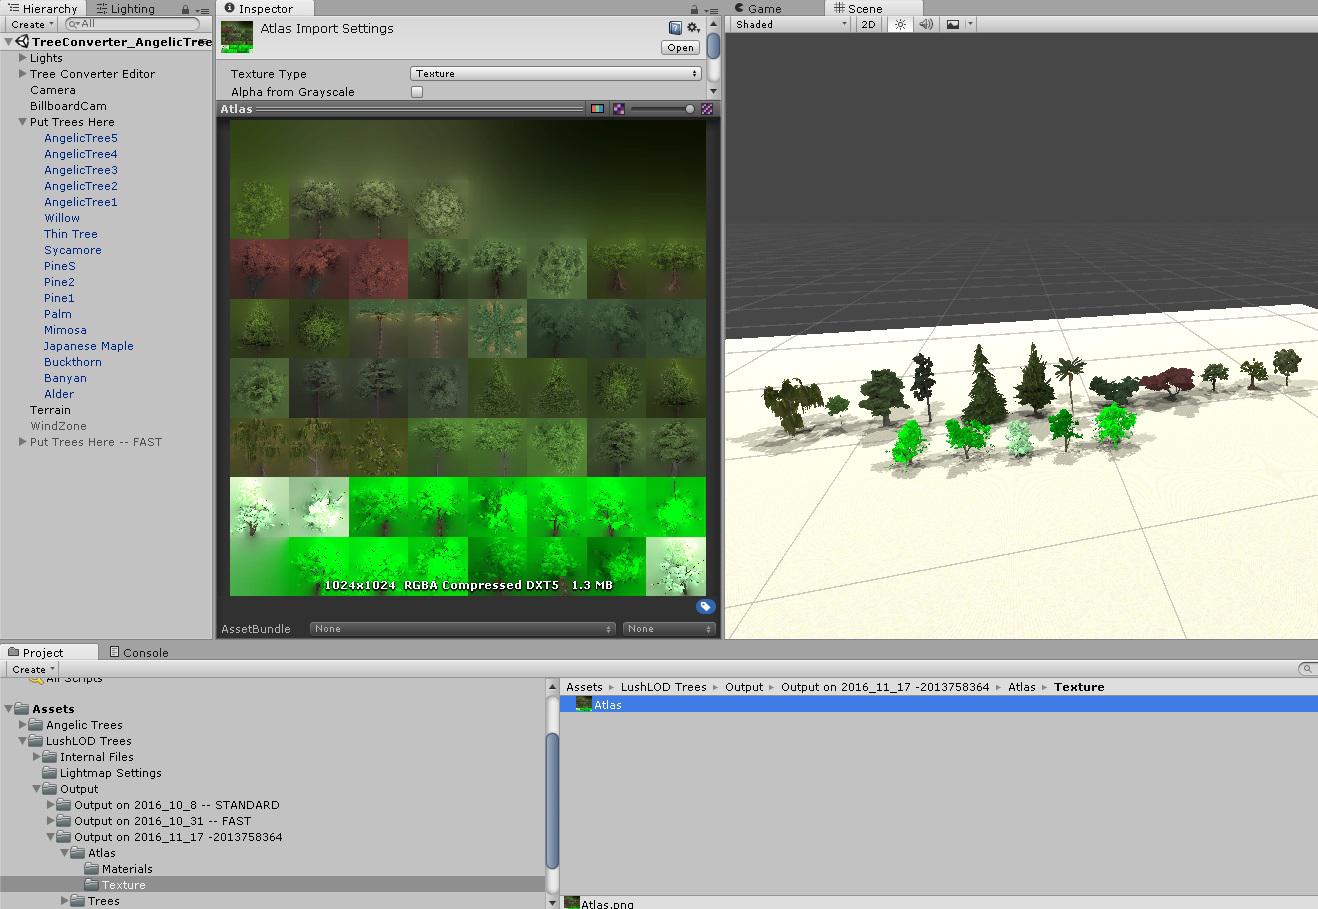
As you can see in the above screenshot, I've got the Tree Converter scene open, and this time I included both the new "Angelic" trees, along with the demo trees in the converter scene. They have all been converted together now, and they have all been added to the same atlas texture. This means have converted all the trees to use this atlas, including both the new "Angelic" trees, and all the other trees from the demo scene. For trees that I want to change, i can now Upgrade them into the "Angelic" trees. But for the trees I want to leave unchanged, I can upgrade them as well, but they won't look any different.
Note that this can increase the size of the atlas texture, so it isn't recommended that you include trees in your atlas that your scene isn't actually going to use. Keeping the atlas texture small will help reduce the memory requirement, and potentially the texture reading speed on the graphics card. Note that you cannot (should not) change the size of the atlas texture manually. The size of the atlas texture is determined automatically by the number of trees in your scene. You can, however, change the size of the billboard images. :)
Billboard Image Size
To change the billboard image size, we'll need to return to the Tree Converter scene.
With the Tree Converter game object selected in the Hierarchy, you should see an option to set the Billboard Texture Size. The default value is 128, which should work fine in most cases. However, if you wish to change it, you must change it to a size that will evenly fit into an atlas. The possible values that you can use are: 32, 64, 128, 256, 512 or 1024.
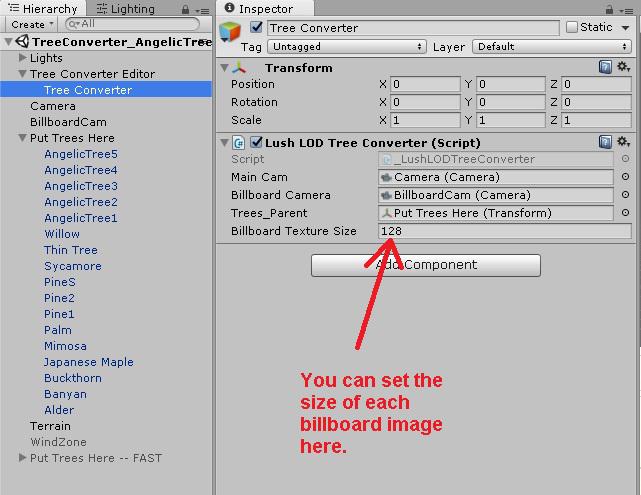
Larger billboard image sizes may look better, but they will require more space in the atlas, which will limit how many trees you can fit into your atlas image. Larger billboard image sizes can also reduce the frame rate of the game. The maximum atlas size is 4096 x 4096. The size of the atlas is calculated automatically during the conversion process, based on the number of trees, and the size of each billboard image.
Thanks for Reading
If you read all the way to here, you're awesome! Thanks for reading.
Customer support service by UserEcho
