Manager Tutorial
An up-to-date version of this guide is available to be viewed online at: https://lushlodtrees.userecho.com/knowledge-bases/2/articles/4-manager-tutorial
Introduction
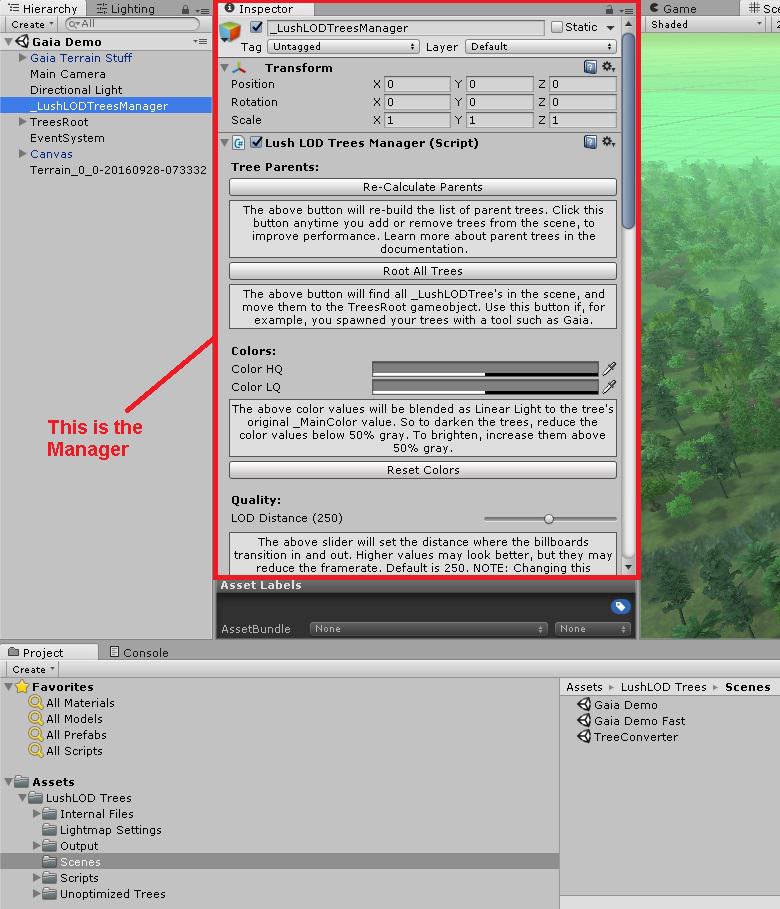
The LushLOD Trees Manager is a script that allows you to easily control most of the common settings for all the LushLOD Trees in your scene. You can change the color and quality of all the trees at once, so that you don't have to try to modify them one at a time. This can be a huge time saver, especially if you have thousands of trees in your scene!
Creating the Manager
The manager isn't there by default, you will need to create it. To learn how to create it, please check out the Quick Start Guide, and then return to this tutorial when you are finish with the basic setup of the manager.
The rest of this tutorial assumes that you've done the Quck Start Guide, and your manager is already finished with its basic setup in your scene.
Every Option Explained
There are quite a few options in the manager, so let's see what each option does.
- Recalculate Parents [button]: This button recalculates the parents in your scene. To understand what parents are, and what they do, I first need to explain why they are needed. Each tree calculates its distance to the main camera. This allows the tree to fade between the low quality billboard, and the high quality tree mesh. But if you have thousands of trees in your scene, it would take a lot of processing power for every tree to calculate its distance to the camera. That's where parent trees come to the rescue. Each parent tree will control all of the trees around it. The trees around it are called "children" trees. When the parent sees that the camera is very far away, it literally shuts off the scripts on all of its children trees, so that those child trees no longer run their Update() functions at all. This saves a lot of otherwise wasted processing power. But when the camera comes close, the parent tree turns its children on, so that they begin to calculate their distance to the camera, and perform their smooth transitions as needed.
You should click this Recalculate Parents button any time you add or move trees around in your scene, to ensure that all the trees know which trees are their parents. If you do not calculate the parents, you will see warning messages to alert you of this. Also, if you ever notice that the trees in your scene are transitioning suddenly or not at all, it is almost certainly because you need to recalculate your parents. You should always try to recalculate your parents when the game is NOT running, so that the parents will be saved. But if you are adding trees to your scene during the game (for example, on dynamically generated terrains), you can calculate the parents during the game as well. - Root All Trees [button]. This button will move all trees to the TreesRoot gameobject. The TreesRoot gameobject is the place where all your LushLOD Trees need to be. When you perform any action on the trees using the manager, it will only affect the trees that are found inside of the TreesRoot. But if you use a tool like Gaia to spawn your trees into your scene, you may notice that it does not spawn them into a "TreesRoot" object of any sort. So once you finish spawning your tree with any third party tool, you can click this button to move all the trees to your TreesRoot game object, and then the manager will be able to control them.
- Colors: The colors area allows you to control the color of both the billboard trees, and the color of the high quality mesh trees. You can use this to create interesting effects.
Changing the color of the billboards can also allow you to potentially fix small differences between the color of the billboards and the color of the high quality trees. However, this is generally not required if the directional light, and the ambient lighting in your scene is all set up correctly. So if you see that the billboards are significantly darker or brighter than the high quality trees, something else is probably wrong, and you should check all of your light settings.
NOTE: LushLOD Trees do not fully support multiple directional lights. If your scene has multiple directional lights, the trees may not look right. Also, the billboards do not receive shadows from any source, so they are best used in open areas that are not likely to be affected by large shadows.
In the future, I hope to add support for large "fake" shadows, which could be controlled by a script, which will allow the trees and the billboards to respond realistically to large shadows from things like mountains or moving clouds. - Reset Colors [button]: If you've made any changes to the colors of your trees, simply click this button to set them back to normal. Be sure to click the "Apply All" button at the bottom of the manager, to apply the changes.
- Ambient Light (Unity 2018.1+): This is the ambient light used to color the trees. This Ambient Light is used for things like Simple Shadows, and it may not be used by some of the other options. This affects the whole tree, but it is much more noticeable in the shadows on the back side of the trees. Note that, when using Simple Shadows mode, the shadows in the trees cannot be any darker than the ambient light, so a bright ambient light will make the shadows bright as well. The only exception to this is the Ambient Occlusion option, which can potentially create totally black shadows inside the trees, even if your Ambient Light isn't dark at all. This option also colorizes the shadow, which can be used to change the color of the shadows, which can let you create interesting effects.
- LOD Distance [slider]: Use this slider to control the distance where the trees will transition into billboards. Larger values will make the trees transition further away. Smaller values will make them transition closer. The default value is 250.
- Billboard Setting [dropdown]: This drop-down option allows you to select the kind of transition that will occur. If you select "Billboard Only", then no transitions will occur, and only billboards will be displayed even if the camera gets very close. Consider using the Billboard Only mode for mobile. If you select "High Quality Models Only", then only the high quality meshes will be displayed, even when the trees are very far away from the camera (not recommended, it's slow). The default option is "Use Both", which will smoothly transition between the high quality and the billboard meshes.
- Rendering Mode [dropdown]: This drop-down option allows you to select between Forward and Deferred rendering mode. You must set this to the same mode that is being used by your Main Camera. So if your main camera is set to render to Deferred, then be sure to set this also to Deferred, or else the trees will not look right. Requires Unity version 5.6+.
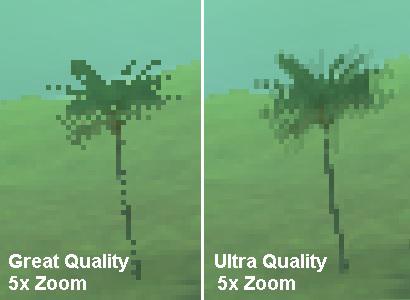
- Billboard Quality [slider]: This slider allows you to control the level of quality of the billboards. There are four quality levels to choose from, including Low, Medium, Great and Ultra. The low quality setting is the fastest, but it has a very faceted look. Medium quality performs angular correction, which checks for billboards that are sharply facing away from the camera, and fades them away. This greatly diminishes the appearance of "lines" in the billboards that aren't facing directly toward the camera. Great quality performs angular correction, and also blends the colors along the seams where the billboards cross each other. This can significantly reduce the faceted look of the billboards, giving them a more soft and natural appearance. Ultra quality performs all of the corrections of the Medium and Great quality settings, and also uses a post-processing effect to create transparency in the trees, which helps soften the trees and smoothen the transitions.
Note that the trees use a "fake" transparency on Low, Medium and Great quality, by creating a checkerboard pattern of pixels. This fake transparency allows the trees to behave like solid objects, while still having a certain appearance of transparency. On high resolution screens, this checkerdboard pattern is so small that it isn't very noticeable. But on low resolution screens, or with a post-processing effect that reduces the resolution of the screen, this checkerdboard appearance may be noticeable. The Ultra quality setting almost entirely blends this checkerdboard pattern and makes it look much better, but at the cost of having to run a full-screen post processing effect to do so. - Cast Shadows [dropdown]: Shadows are one of the most expensive calculations in Unity. For trees that don't move, it's best to try to bake your tree's shadows. This will allow you to turn real-time shadow calculations off, and you'll see a noticeable improvement in frame rate, especially if you have thousands of trees in your scene. See the shadow baking tutorial for help with shadow baking.
This "Cast Shadows" dropdown option lets you select the type of shadow casting the trees will do. The billboards can cast shadows, and actually the shadows cast by the billboards is surprisingly good. But the billboards cannot react to wind zones. So if you plan to use a Wind Zone to make the trees animate in the wind (and yes, LushLOD Trees support Wind Zones), then you'll probably want the shadows to animate as well. So let's see what our options are.
Use Both: This option will smoothly transition between billboard shadows for far away trees, and high quality mesh shadows for trees that are closer to the camera. This is a nice balance between speed and quality. The shadows will animate when they are closer to the camera (if you have a Wind Zone active), but for far away trees they will gradually begin to stop animating as they smoothly transition into the billboard shadows.
Billboard Shadows Only: This option will always cast shadows from the billboards. This is somewhat faster because the billboards are simple, and their shadows require less processing power to render. This option is best if you do not plan to use Wind Zones.
Realtime Shadows Off: Use this option if you've baked your shadows. This will turn off all shadow calculations, which gives a noticeable improvement in frame rate if you have lots of trees in the scene. - Receive Shadows [dropdown]: Receiving shadows is also very expensive, especially for a large number of trees. To help with this, I created a "fake" self-shadowing shader which I call "Simple Shadows". But let's see what our options are here.
All Shadows: This option will make the trees receive realtime shadows from all sources in the game. This is the most expensive option, but it will allow the high quality trees to respond to shadows from things like clouds and mountains. However, the billboards never receive any shadows, so using this option will cause the high quality trees to potentially look much darker than the billboards, which can degrade the overall quality of the transitions. Additionally, this option can cause the billboards to cast shadows on the high quality tree models, which can create dark lines in the trees. This option is generally not recommended in most cases, so be cautious about building or designing a game around this option.
Simple Shadows: This option uses fully baked shadow maps to create super-fast, realtime shadows in the high quality tree models. However, this only allows each tree to cast shadows upon itself. This means that the backside of the tree will be darker, and the side of the tree that faces towards the main direction light will be brighter in appearance. This can create a natural, soft shadow in the trees, which moves if you move the main directional light. But Simple Shadows does not respond to any real-time shadows, including shadows being cast from any other tree, or from any other object in the game, such as shadows from clouds or mountains. Simple Shadows is the default option.
No Shadows: This option will make the trees not receive any shadows at all. This creates a very cartoon style. Note that this option doesn't work correctly if you baked your lights. - Simple Shadows Advanced Settings: These sliders control various things about the shadows in the trees. I will discuss each option in detail at the end of this guide.
- Apply All [button]: You must click this button anytime you change any of the settings, to apply those settings to the trees.
- Enable Undo [checkbox]: You can use this checkbox to disable Unity's builtin Undo / Redo system. If you have thousands of trees in your scene, it can begin to get really slow if the manager has to write undo information for every change it makes to the trees. However, most changes made by the manager can be easily undone by the manager, so Unity's builtin Undo system is generally not necessary and you can safely turn it off if it is slowing down your work. This only affects the manager in Edit mode, and it has no affect while the game is running.
- Main Directional Light [Light]: This is a reference to your main directional light. This is required by many of the LushLOD Tree shaders.
- Ready Shadow Baking [button]: This button is used to enter shadow baking mode. In this mode, the trees will become simplified billboards, and billboard shadows will be enabled. This mode prepares your scene for shadow baking. To learn more about how to use this button, and how to bake your tree shadows, see the Shadow Baking tutorial.
- Tree Preview Quality [dropdown and button]: This dropdown and the button below it are used to set the quality level for the trees when the game is NOT running. This has absolutely no effect on how the trees will look when the game is running. This affects how the trees are displayed in the Editor. However, if you have a large scene with thousands of trees, you may experience lag in the editor, which you can fix by simply setting this Preview Quality to either Billboard or None. Note: Requires Unity version 5.6+.
- Revert All [button]: This button will revert all trees in the scene to their prefabs. This means that all the data in the prefab files for each tree will be re-loaded from the files. This can be used to undo changes made to the trees with the manager. NOTE: This may not undo all changes that you make to the materials, textures or meshes that are attached to the trees, since materials and meshes are saved into separate files.
Simple Shadows Advanced Settings:
These options are only available in Unity 2018.1 or higher.
This options only work if you are using Simple Shadows as your Shadow Receive option, which is described above.
Note that the billboards have shadows too, and they too are affected by the angle of the main directional light. However, because the billboards are far less detailed, most of the options found here are ignored by the billboards. ONLY the "Ambient Light", the "Shadow Clip", and the "Sunrise / Sunset Awareness" options are able to affect the shadows on the billboards. The billboard shadows totally ignore all the other options in this section, so be careful about that. If you go crazy with the other sliders, your high quality tree meshes will be affected, but your billboards won't be, which could make the shadows look very different up close than they do from far away, which could make the billboard transitions appear more obvious and be less convincing.
- Ambient Occlusion: This slider controls a fake "shadow" that appears in the center of the trees, where light is less likely to be. This darkening is unaffected by things like ambient light, or directional lights, or any kind of light in the scene. Even with shadows turned off, or very bright light, you can still have ambient occlusion creating darkness in the center of the trees with this option. However, if you are simply trying to make your shadows darker, you should not excessively increase this value to accomplish that, because Ambient Occlusion isn't real shadows, and they won't change based on the angle of the sun. You can use the other settings found below to make the shadows as dark as you need, without needing to increase the Ambient Occlusion excessively.
- Sunset / Sunrise Awareness: This controls whether or not the trees gradually turn dark as the angle of your main directional light is turned upward or downward. Turning the directional light to face upward would cause the trees to turn dark (the maximum darkness would be limited to the color of you Ambient Light), because the tree's assume that it is night time. Turning the directional light to face downward would be the middle of the day, so the trees would be fully illuminated. If you do not wish for this effect to occur, you can turn this feature off using this slider, and then the trees will remain illuminated no matter which direction the light is facing.
- Translucency: When viewing the trees from the back side (with the light from the "sun" coming from the other side of the tree), this value controls how much the light will appear to go through the leaves. Basically, this makes the edges of the tree look like they glow a little, because some light is supposed to be going through the leaves. If you do not like this effect, you can turn it off here.
- Translucency Contrast: This controls how hard (or soft) the edge of the translucency effect is. This only affects the Translucency. So if Translucency is turned off, this also will have no effect.
- Shadow Size: This controls the size of the shadow on the back side of the trees. Basically, this controls how far the shadow wraps around the sides of the tree. This does not control how dark the shadow is, it only controls where the edge of the shadow begins. Note that, to make the shadow darker, you may need to darken your Ambient Light (you can scroll up to find the Ambient Light setting in the Manager), because your shadows cannot be darker than the Ambient Light. Likewise, if you wish to lighten your shadows, you can either brighten the Ambient Light, or you can use the Shadow Clip option below. You should not adjust the Shadow Size simply to lighten or darken the shadows, because that's not what this slider is meant to do. Darkening and lighting the shadow is best done via those other options.
Note that, the Shadow Size option is also available to be controlled separately for each type of tree in your scene. So if you are trying to change the size of the shadow on a specific tree, simply select that specific tree and you will see the Shadow Size option is available for it. So you can use the manager to change the Shadow Size for all your trees. Or, you can change the Shadow Size for a specific tree, by selecting the tree you want to adjust, and looking at its Inspector window. - Shadow Clip: This option allows you to forceably reduce the maximum darkness of the shadows. After the shadows have been calculated, this Shadow Clip value will force the shadow to not be any darker than the amount you specify. This can create a shadow that looks flat and lacking in depth, so try some of the other options before you resort to using this option to clip the shadow. The default value is 1, which doesn't clip the shadow at all. Using a value less than 1 will clip the shadow.
Customer support service by UserEcho
